
The MFJ 209 is equipped with a wide range of features that make it an indispensable tool for any radio operator. With its compact and portable design, you can easily take it with you wherever you go, allowing you to analyze and tune your antenna system on the spot. Whether you are setting up a new antenna or troubleshooting an existing one, the MFJ 209 provides you with the necessary information and tools to get the job done.
In addition to its measurement capabilities, the MFJ 209 also offers a range of tuning options. With its built-in variable capacitor and inductor, you can easily adjust the resonant frequency of your antenna system to match your desired frequency. The MFJ 209 also features a built-in dummy load, allowing you to test your transmitter without the need for an external antenna.
Overall, the MFJ 209 is a must-have tool for any radio operator or antenna enthusiast. Its compact design, accurate measurements, and tuning capabilities make it the ultimate companion for optimizing the performance of your antenna system. Whether you are a beginner or an experienced operator, the MFJ 209 will undoubtedly enhance your radio experience and help you achieve the best possible signal quality.
The Ultimate Guide to Mfj 209
The Mfj 209 is a versatile and powerful tool for any electronics enthusiast. Whether you are a beginner or an experienced user, this device has a range of features that will help you with your projects.
Features of Mfj 209

The Mfj 209 comes with a variety of features that make it a must-have for any electronics enthusiast. Here are some of its key features:
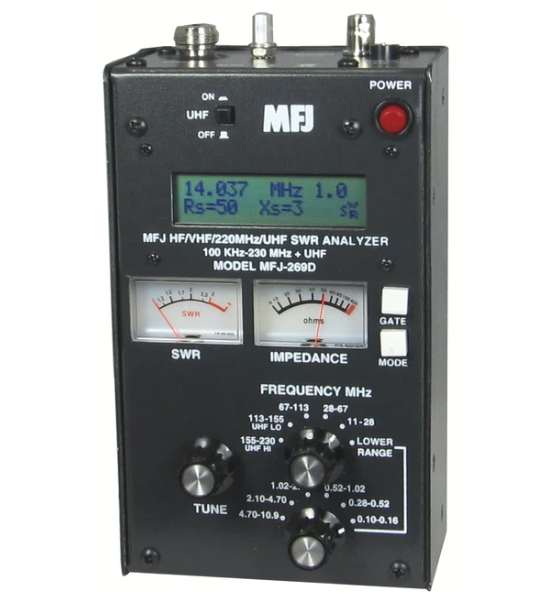
- Frequency Range: The Mfj 209 has a wide frequency range, allowing you to work with a variety of signals.
- Signal Generator: This device can generate signals of various types, including sine, square, triangle, and sawtooth waves.
- Signal Analyzer: The Mfj 209 can analyze signals and provide you with valuable information about their frequency, amplitude, and phase.
- Impedance Measurement: With the Mfj 209, you can measure the impedance of various components, such as resistors, capacitors, and inductors.
- Frequency Counter: This device has a built-in frequency counter that can accurately measure the frequency of signals.
How to Use Mfj 209

Using the Mfj 209 is straightforward. Here are the steps to get started:
- Connect the Mfj 209 to a power source using the provided power cable.
- Turn on the device by pressing the power button.
- Set the desired frequency using the frequency control knob.
- Select the type of signal you want to generate using the signal type selector.
- Adjust the amplitude and other parameters as needed.
- Connect the Mfj 209 to your circuit or device using the appropriate cables.
- Monitor the signal using the built-in display or connect the device to a computer for further analysis.
With these simple steps, you can start using the Mfj 209 and explore its various features.
Troubleshooting Mfj 209
If you encounter any issues with the Mfj 209, here are some troubleshooting tips:
- No Power: Check if the power cable is properly connected and if the power source is functioning.
- No Signal: Ensure that the frequency, amplitude, and other parameters are set correctly.
- Poor Signal Quality: Check the connections and cables for any loose or damaged parts.
- Unexpected Behavior: Try resetting the device or consulting the user manual for further instructions.
By following these troubleshooting tips, you can resolve most issues with the Mfj 209 and continue with your projects.
Features of Mfj 209
The Mfj 209 is a versatile and powerful tool that offers a wide range of features to assist you in your electronic projects. Whether you are a hobbyist or a professional, the Mfj 209 has something to offer.
1. High Accuracy
The Mfj 209 is known for its high accuracy measurements. It can provide precise readings for various parameters such as voltage, current, resistance, and frequency. This allows you to have confidence in the measurements you are taking.
2. Easy to Use
With its user-friendly interface, the Mfj 209 is easy to operate. It features a clear LCD display that shows all the necessary information at a glance. The buttons are well-labeled and intuitive, making it simple to navigate through the different functions.
3. Wide Measurement Range
The Mfj 209 offers a wide measurement range, allowing you to work with a variety of components and circuits. It can handle both small and large values, making it suitable for a wide range of applications.
4. Multiple Functions
In addition to basic measurements, the Mfj 209 also offers several advanced functions. It can perform diode and continuity tests, as well as capacitance and temperature measurements. This makes it a versatile tool that can be used in various electronic projects.
5. Portable and Durable
The Mfj 209 is designed to be portable and durable. It is compact and lightweight, making it easy to carry around. It is also built to withstand rugged conditions, ensuring that it can handle the demands of your projects.
Overall, the Mfj 209 is a reliable and feature-packed tool that can greatly enhance your electronic projects. Its high accuracy, ease of use, wide measurement range, multiple functions, and portability make it a valuable addition to any toolbox.
How to Use Mfj 209
Using the Mfj 209 is a straightforward process that can be easily mastered with a few simple steps. Whether you are a beginner or an experienced user, this guide will walk you through the process of using the Mfj 209 effectively.
Step 1: Powering On
The first step in using the Mfj 209 is to power it on. Simply locate the power button on the device and press it to turn it on. Wait for the device to boot up and initialize before proceeding to the next step.
Step 2: Connecting the Antenna
Next, you will need to connect the antenna to the Mfj 209. Locate the antenna port on the device and plug in the antenna cable securely. Ensure that the connection is tight to avoid any signal loss or interference.
Step 3: Selecting the Frequency
Once the antenna is connected, you can now select the desired frequency on the Mfj 209. Use the frequency knob or buttons to navigate through the available frequencies. Refer to the user manual for specific instructions on how to select the frequency.
Step 4: Adjusting the Settings
After selecting the frequency, you may need to adjust the settings on the Mfj 209 to optimize the performance. This may include adjusting the signal strength, bandwidth, or other parameters depending on your specific requirements. Refer to the user manual for detailed instructions on how to adjust the settings.
Step 5: Monitoring the Signal
Once the settings are adjusted, you can start monitoring the signal on the Mfj 209. The device will display the signal strength, frequency, and other relevant information on the screen. Use this information to analyze the signal and make any necessary adjustments.
Step 6: Analyzing the Results

As you monitor the signal, you can analyze the results to determine the quality and strength of the signal. Pay attention to any anomalies or fluctuations in the signal and make note of them for further analysis or troubleshooting.
Step 7: Recording and Saving Data
If desired, you can record and save the data from the Mfj 209 for future reference or analysis. The device may have a built-in memory or storage option for saving the data. Refer to the user manual for instructions on how to record and save data.
By following these steps, you can effectively use the Mfj 209 and maximize its capabilities. Remember to refer to the user manual for specific instructions and guidelines on using the device.
Troubleshooting Mfj 209
When using the Mfj 209, you may encounter some issues that can affect its performance. Here are some common troubleshooting steps to help you resolve any problems:
No Power
If the Mfj 209 is not turning on, check the power source. Ensure that it is properly connected and that the outlet is functioning. If the power source is fine, check the power switch on the Mfj 209 to make sure it is in the “on” position. If the device still does not power on, there may be an issue with the internal circuitry, and it is recommended to contact technical support for further assistance.
Poor Signal Quality
If you are experiencing poor signal quality with the Mfj 209, there are a few things you can check. First, make sure that the antenna is properly connected to the device. Ensure that the antenna is positioned correctly and that there are no obstructions blocking the signal. Additionally, check the cable connections to ensure they are secure and not damaged. If the signal quality is still poor, try adjusting the settings on the Mfj 209 to optimize the signal strength.
Note: It is also important to consider external factors that may be affecting the signal quality, such as interference from nearby electronic devices or environmental conditions.
Error Messages

If you encounter error messages on the Mfj 209 display, refer to the user manual for a list of common error codes and their meanings. Follow the recommended troubleshooting steps provided in the manual to resolve the specific error. If the error persists, it may indicate a more serious issue with the device, and it is advisable to seek professional assistance.
Remember, troubleshooting the Mfj 209 requires careful attention to detail and following the instructions provided in the user manual. If you are unsure or unable to resolve the issue on your own, it is always best to seek assistance from a qualified technician or contact the manufacturer’s technical support for further guidance.

Over the years, I have amassed a wealth of experience and knowledge, which I eagerly share with fellow radio aficionados. Through my writing and active participation in the amateur radio community, I strive to inspire others and provide valuable insights into this fascinating hobby. Engaging in various radio activities, I continue to learn and grow, constantly amazed by the endless possibilities that radio communication offers.