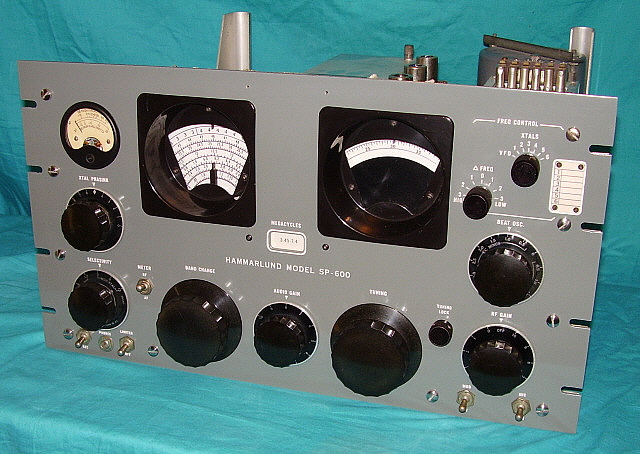

What sets the Hammarlund SP 600 apart from other radio receivers of its time is its superior design and engineering. The receiver features a robust construction, with a heavy-duty chassis and high-quality components. Its large tuning dial and clear, easy-to-read markings make tuning in to your favorite stations a breeze.
But it’s not just the physical design that makes the Hammarlund SP 600 special. Its performance is equally impressive. The receiver covers a wide frequency range, from longwave to shortwave, and delivers exceptional sensitivity and selectivity. Whether you’re listening to AM, FM, or CW signals, the SP 600 provides crystal-clear reception.
Another standout feature of the Hammarlund SP 600 is its versatility. It can be easily modified and upgraded to meet the specific needs of the user. From adding filters to improving audio quality, there are countless ways to customize the receiver to suit your preferences. This flexibility has made the SP 600 a favorite among radio enthusiasts who enjoy tinkering and experimenting with their equipment.
History and Background of the Hammarlund SP 600
The Hammarlund SP 600 is a classic radio receiver that was first introduced in the 1950s. It was manufactured by the Hammarlund Manufacturing Company, which was founded in 1910 by Oscar Hammarlund. The company initially focused on producing high-quality radio equipment for the military, but later expanded its product line to include consumer radios.
The SP 600 was one of the most popular models produced by Hammarlund and quickly gained a reputation for its exceptional performance and durability. It was widely used by amateur radio operators, military personnel, and commercial broadcasters.
Design and Construction
The Hammarlund SP 600 was built to last, with a sturdy metal chassis and high-quality components. It featured a large tuning dial and a clear, easy-to-read display, making it simple to tune in to the desired frequency. The receiver also had a built-in speaker, eliminating the need for external speakers.
One of the unique design elements of the SP 600 was its use of plug-in coils. These coils allowed users to easily change the frequency range of the receiver, making it adaptable to different operating conditions. The receiver also had a built-in noise limiter, which helped to reduce interference and improve the overall signal quality.
Legacy and Collectibility
Features and Specifications of the Hammarlund SP 600
The Hammarlund SP 600 is a classic radio receiver that was first introduced in the 1950s. It quickly became popular among radio enthusiasts and professionals due to its exceptional performance and versatility. Here are some of the key features and specifications of the Hammarlund SP 600:
1. Frequency Coverage:
The SP 600 offers a wide frequency coverage, ranging from 540 kHz to 54 MHz. This allows users to tune in to a variety of AM, FM, and shortwave radio stations.
2. Selectivity:
One of the standout features of the SP 600 is its excellent selectivity. It is equipped with a crystal filter that helps to eliminate unwanted signals and interference, ensuring clear and crisp reception.
3. Sensitivity:
The SP 600 is known for its high sensitivity, allowing users to pick up weak signals with ease. This makes it ideal for DXing (long-distance reception) and for listening to distant stations.
4. Tuning Options:
The SP 600 offers both manual and automatic tuning options. It has a large tuning dial that allows for precise frequency selection, and it also has a built-in automatic frequency control (AFC) feature that helps to maintain stable reception.
5. Audio Quality:
The audio quality of the SP 600 is exceptional, thanks to its high-quality audio amplifier and speaker. It delivers clear and natural sound, making it a pleasure to listen to your favorite radio stations.
6. Build Quality:
The SP 600 is built to last, with a sturdy construction and high-quality components. It features a metal chassis and a durable front panel, ensuring that it can withstand years of use.
7. External Connections:
The SP 600 is equipped with various external connections, including antenna inputs, audio outputs, and a headphone jack. This allows users to connect external antennas and audio devices for enhanced performance and flexibility.
How to Use the Hammarlund SP 600 Radio Receiver
1. Powering On the Receiver
Before using the Hammarlund SP 600, make sure it is properly connected to a power source. Once connected, turn on the power switch located on the front panel of the receiver. You will notice the power indicator light up, indicating that the receiver is now powered on.
2. Tuning the Frequency
The Hammarlund SP 600 allows you to tune into different frequencies to listen to various radio stations. To tune the frequency, use the tuning knob located on the front panel. Turn the knob clockwise or counterclockwise to adjust the frequency. The frequency will be displayed on the frequency dial.
3. Selecting the Bandwidth
The Hammarlund SP 600 offers different bandwidth options to enhance your listening experience. To select the desired bandwidth, use the bandwidth switch located on the front panel. Choose between narrow and wide bandwidth options based on your preference and the quality of the radio signal.
4. Adjusting the Volume

To adjust the volume of the audio output, use the volume control knob located on the front panel. Turn the knob clockwise to increase the volume and counterclockwise to decrease it. Find the optimal volume level that suits your listening environment.
5. Using the Mode Selector
The Hammarlund SP 600 offers different operating modes, including AM, CW, and SSB. To select the desired mode, use the mode selector switch located on the front panel. Choose the appropriate mode based on the type of signal you want to receive.
6. Fine-tuning the Signal
If you encounter a weak or distorted signal, you can fine-tune it using the fine-tuning knob located on the front panel. Turn the knob slowly until you achieve a clear and strong signal. This will help improve the overall reception quality.
7. Using the Noise Blanker
The Hammarlund SP 600 is equipped with a noise blanker feature that helps reduce unwanted noise interference. To activate the noise blanker, use the noise blanker switch located on the front panel. This feature can significantly improve the clarity of the received signal.
8. Connecting External Devices
The Hammarlund SP 600 allows you to connect external devices, such as antennas and speakers, to enhance its functionality. Refer to the user manual for detailed instructions on how to properly connect and configure external devices.
By following these steps, you will be able to effectively use the Hammarlund SP 600 radio receiver and enjoy its exceptional performance and audio quality.
Maintenance and Troubleshooting Tips for the Hammarlund SP 600

Proper maintenance is essential to keep your Hammarlund SP 600 radio receiver in top condition. Here are some tips to help you with the maintenance and troubleshooting of your SP 600:
1. Regular Cleaning: Dust and dirt can accumulate on the surface of the radio receiver, affecting its performance. Use a soft cloth to wipe the exterior of the SP 600 regularly. Avoid using harsh chemicals or abrasive materials that can damage the finish.
2. Inspection of Components: Periodically inspect the components of the SP 600 for any signs of wear or damage. Look for loose connections, frayed wires, or burnt-out resistors. Replace any faulty components to ensure optimal performance.
3. Calibration: The SP 600 may require calibration from time to time to maintain accurate tuning. Follow the manufacturer’s instructions for calibrating the radio receiver. Use a signal generator and an accurate frequency counter for precise calibration.
4. Tube Replacement: The vacuum tubes in the SP 600 can wear out over time and affect the radio’s performance. Keep a stock of replacement tubes and regularly check the tubes for signs of wear or malfunction. Replace any faulty tubes with new ones to ensure proper functioning.
5. Antenna and Grounding: Check the antenna and grounding connections regularly. Ensure that the antenna is properly connected and the grounding is secure. Poor antenna or grounding can result in weak signals or interference.
6. Troubleshooting Common Issues: If you encounter any issues with your SP 600, here are some common troubleshooting steps:
– No Power: Check the power cord and ensure it is properly connected. Check the fuse and replace if necessary.
– Weak Signals: Check the antenna and grounding connections. Adjust the tuning and calibration. Check for any loose connections or faulty components.
– Interference: Check for nearby sources of interference, such as other electronic devices or power lines. Move the SP 600 away from these sources if possible.
– Distorted Audio: Check the audio cables and connections. Adjust the volume and tone controls. Check for any loose or damaged components.
7. Professional Servicing: If you are unable to resolve any issues with your SP 600, it is recommended to seek professional servicing. There are experienced technicians who specialize in vintage radio receivers and can provide expert repairs and maintenance.
By following these maintenance and troubleshooting tips, you can ensure that your Hammarlund SP 600 radio receiver continues to provide excellent performance and enjoyment for years to come.
Collecting and Restoring the Hammarlund SP 600
Collecting and restoring vintage radios can be a rewarding hobby for enthusiasts. The Hammarlund SP 600 is a classic radio receiver that is highly sought after by collectors. If you are interested in adding this iconic piece of radio history to your collection, or if you already own one and want to restore it to its former glory, here are some tips to help you get started.
Research and Documentation
Additionally, try to find any available documentation or manuals for the SP 600. These resources can provide valuable information on how to properly operate and maintain the radio receiver, as well as assist you in the restoration process.
Inspecting and Cleaning
Next, open up the radio receiver and inspect the interior components. Look for any signs of corrosion, loose connections, or damaged parts. Clean the chassis, tubes, and other components using appropriate cleaning solutions and tools. Be cautious and gentle to avoid causing any further damage.
Replacing and Repairing
If you discover any faulty or damaged components during the inspection, it may be necessary to replace or repair them. Look for reputable suppliers or vintage radio parts dealers who specialize in Hammarlund SP 600 components. This will ensure that you are getting authentic and compatible parts for your restoration project.
When replacing components, be sure to follow the proper procedures and guidelines outlined in the documentation or manuals. Take your time and exercise caution to avoid any mistakes or further damage to the radio receiver.
Testing and Calibration
Once you have completed the necessary repairs and replacements, it is time to test and calibrate the Hammarlund SP 600. Connect the radio receiver to a suitable power source and antenna. Follow the instructions in the documentation or manuals to properly tune and calibrate the radio.
Be patient during this process, as it may take some time and adjustments to achieve optimal performance. Take note of any issues or adjustments that need to be made, and make the necessary changes to ensure that the SP 600 is functioning at its best.
Remember to exercise caution when working with vintage electronics, especially when dealing with high voltages. If you are unsure or uncomfortable with any aspect of the restoration process, it is always best to seek the assistance of a professional.
By following these tips and taking the necessary steps, you can successfully collect and restore the Hammarlund SP 600. Whether you are a seasoned collector or a beginner in the world of vintage radios, this iconic radio receiver is sure to be a valuable addition to your collection.

Over the years, I have amassed a wealth of experience and knowledge, which I eagerly share with fellow radio aficionados. Through my writing and active participation in the amateur radio community, I strive to inspire others and provide valuable insights into this fascinating hobby. Engaging in various radio activities, I continue to learn and grow, constantly amazed by the endless possibilities that radio communication offers.